My son Noah decided he'd like to help me build something for Warhammer and with a Siege game coming up there is lots to do, so I readily accepted his help.
I've already posted on building and converting a Mighty Fortress, building siege towers and painting the castle so I figured that Noah could help me with the building of some battering rams.
Bear in mind two things:
- I wanted to get him to do as much of the work for this as possible himself. His last school report was glowing apart from the sections pertaining to Art and Design & Technology. I wanted him to gain some confidence with measuring, cutting, glueing and painting with different materials.
- He's only six.
Getting Started
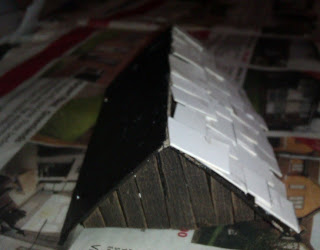
We started off by making the roof sections for the rams. A base section of foamcore was cut with two triangular foamcore end-pieces added that we could add a pitched roof to. The end-pieces were clad in roughly-cut balsa and the whole thing painted black.When dry, the balsa was drybrushed with two shades of brown to bring all the wood-grain back out.
We cut some thick card rectangles and scored them once along the middle so that they would fold neatly. This would be the support for our roof tiles. These also were painted black then glued into place.
Next we cut out some small squares of card from a cereal box and glued them in higgledy-piggledy fashion to the black-painted card to form tiles.
We also painted these black, before overbrushing top-to-bottom with navy blue and then drybrushing bottom-top with white.
We then cut some more foamcore to form the base of the model (I trimmed the small square insets at the corners that would accept the "pillars") and also cut some balsa struts with which we'd clad the sides of the foamcore and that would form the pillars.
Balsa "planks" were glued on the upper surface. The whole thing was painted black and then drybrushed with two shades of brown. Then the supporting pillars were glued into the corners.
The long-overdue final update to this project.
Once we'd reached this point, this project fell by the wayside a little. School started again and "real life" got in the way a bit too. However our hand has been forced recently as an (imminent) date has been set for the Siege (tomorrow!) so we needed to finish up.Next we started work on the rams themselves. We'd picked up some reasonably sized sticks when walking in the woods recently which we cut to size with a razor saw - we one end cut "square" and the other to a 45 degree angle (to later accept a "head" - read on for details). We painted them black, gave them a serious drybrushing in a red-brown colour and then painted in the bark-free areas with Citadel "Bronzed Flesh". The paint job was finished off using a sepia wash.
Next we drilled then pinned-and-glued some old Chaos Boars Heads (left over from my Beastmen Chariots to form the front of the rams). These were drybrushed up to look metallic and glued onto the rams.
Next, we cut some chain (from an inexpensive costume-jewellery piece) to length and wrapped it round the rams (sticks), securing it in place with some PVA. The chains were pinned into the foamcore base of the roof section with tailor's pins.
Then we attached the roof to the base (some small holes were made in the base of the roof to accept the corner-pillars) with more PVA. One fault here on my part was not making sure in the early stages of the build that the pins I'd used to secure the triangular end-pieces were either removed or put in a more sympathetic location - these were buried just below the surface of the location where I wanted the corner pillars to slot into the base of the roof and as such the roof isn't as securely fixed as I'd have liked. It was impossible to remove the pins at this stage as they were now hidden beneath the balsa "planks" that were cladding the end-sections. Ho-hum.
Disaster strikes!
I'd completely forgotten to take into account the fact that the boar-heads had mass! When installed, the logs see-sawed nose downwards. We had to remove the rams from the model and add replace the metal heads with some plastic bits (a Beastman Standard top and a Chaos Spawn head). They were a bit too small so we covered the join by wrapping a bit of chain around the point where they met the "logs". Paint black, drybrush metal. Problem solved.
Lastly came the wheels. Some plastic rods formed axles and the wheels were painted and attached using 2-part epoxy glue.
All work was genuinely done by Noah (with a guiding hand, of course), with the exception of:
- Pushing in some of the reinforcing tailor's pins. Penetrating the cardstock requires quite a "push" so I did that. Noah then pushed them home using a rubber-tipped pencil.
- Cutting the log-rams to size and shaping the ends to accept the boars' heads.
- Flattening and drilling the boar's heads - they're lead pieces so difficult to work safely on with small hands.
 |
| Noah |


No comments:
Post a Comment
I'm interested to hear what you think. Please leave any comments you'd like to make here.